opinion
Flutter: The Future of Mobile Development?
January 20, 2019
I’ve worked a bit with Flutter over the past few months primarily on a budgeting app that I’m currently in the process of completely redesigning and remaking using Flutter 1.0. Before working with Flutter, I’ve done some Android development (Java) and iOS development (Objective-C). Between Java, Objective-C, and Flutter, I do believe that Flutter is becoming, and will end up, the go-to tool for mobile app development.
Powered by Dart
Flutter uses Dart, which I’m sure a lot of people have never heard of, or have heard very little about. If you’re coming from a Java background, you should feel right at home with Dart. Even if your not, I think you’ll be pleasantly surprised with the simplicity and power of it. After using it for a few months, I have only a few complaints that I’ll discuss near the end of this post.
UI Development
UI development isn’t my favorite thing, I’m more of a backend developer, so when it comes to working on something that is very dependent on it, I want something simple yet very powerful. This is what makes Flutter shine in my eyes.
One thing I absolutely love that makes UI development simple is that Flutter gives you the ability to create a theme for your app. This allows you to set font styles, font sizes, app colors, and so forth allowing you to keep the visuals consistent throughout your app. I’ve always had a problem with this throughout my projects, so it helps me out a ton.
Here’s a snippet of the theme data that I’m using for my app:
themeDataExample.dart
ThemeData(
    brightness: Brightness.light,
    backgroundColor: Colors.blueGrey[50],
    primarySwatch: Colors.blueGrey,
    primaryColor: Colors.blueGrey[50],
    primaryColorDark: Colors.grey[900],
    accentColor: Colors.grey[900],
    fontFamily: 'Poppins',
    primaryTextTheme: Typography.blackCupertino,
    accentTextTheme: Typography.whiteCupertino,
),
This snippet does quite a few different things: sets the brightness, background color, primary and accent text colors, font family, and the primary and accent text themes. This is just a portion of what you can do with theme data. You can also set the theme of input fields, icons, and pretty much everything else. Flutter will follow this theme data throughout your app, giving it a consistent look without having to do any extra work.
As well as that, Flutter is widget-based, by which I mean you can create a complete UI by piecing together different widgets. Despite this simplicity, you have full control over the UI, and whatever you want to do with it you can do. And if Flutter doesn’t have a built-in widget for what you need, you can easily create one that suits your needs.
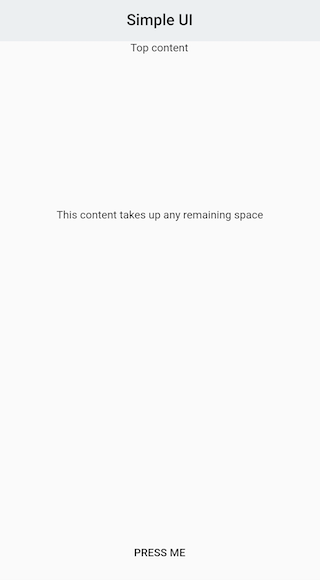
For example, if you want to create a UI with three rows of content, you can do so very easily:
simpleUI.dart
@override
Widget build(BuildContext context) {
    return Scaffold(
        appBar: AppBar(
            title: Text(widget.title),
            centerTitle: true,
            elevation: 0,
        ),
        body: Column(
            children: [
                Container(
                    height: 215.0,
                    child: Text('Top content'),
                ),
                Expanded(
                    child: Text('This content takes up any remaining space'),
                ),
                Container(
                    height: 75.0,
                    child: SizedBox.expand(
                        child: FlatButton(
                            onPressed: () {
                                // Do something on press
                            },
                            child: Text('PRESS ME'),
                        ),
                    ),
                ),
            ],
        ),
    );
}

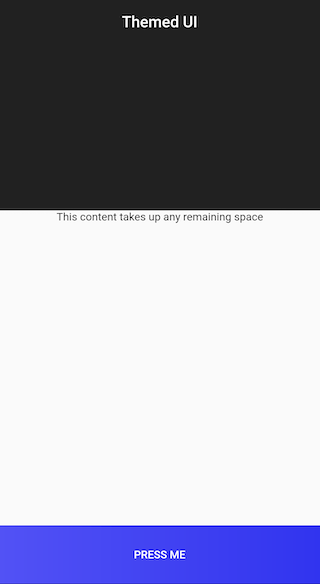
It’s that easy to build your UI. But this isn’t very pretty, so we can take this another step further by modifying the colors, text, etc. Let’s make use of the theme data above to accomplish this:
themedUI.dart
@override
Widget build(BuildContext context) {
    return Scaffold(
        appBar: AppBar(
            title: Text(
                widget.title,
            ),
            backgroundColor: Theme.of(context).accentColor,
            textTheme: Theme.of(context).accentTextTheme,
            centerTitle: true,
            elevation: 0,
        ),
        body: Column(
            children: [
                Container(
                color: Theme.of(context).accentColor,
                height: 215.0,
            ),
            Expanded(
                child: Text('This content takes up any remaining space'),
            ),
            Container(
                height: 75.0,
                decoration: const BoxDecoration(
                    gradient: LinearGradient(
                        begin: Alignment.centerLeft,
                        colors: [const Color(0xFF5252F5), const Color(0xFF3134EF)],
                        tileMode: TileMode.repeated,
                    ),
                ),
                child: SizedBox.expand(
                    child: FlatButton(
                        onPressed: () {
                            // Do something on press
                        },
                        child: Text(
                            'PRESS ME',
                            style: Theme.of(context).accentTextTheme.button,
                        ),
                    ),
                ),
            ),
        ],
    );
}

This looks good and will look even better once more content is added to each of these sections. I think this goes to show how simple it is to develop a nice user interface in no time at all using Flutter.
To end this section, Flutter also offers hot reload which allows you to make changes to your app and see the changes in no time at all, without needing to rebuild. This in itself saves an incredible amount of time.
Backend Development
Backend development is more up my alley, and I am very pleased with how easy it is to make data-driven apps using Flutter and Dart. Thanks to singletons in Dart, and the sqlflite package, creating a class for handling and working with your database is incredibly simple.
database.dart
import 'dart:io';
import 'package:sqflite/sqflite.dart';
import 'package:path_provider/path_provider.dart';
import 'package:path/path.dart';

class DBProvider {
    DBProvider._();

    static final DBProvider db = DBProvider._();
    Database _database;

    Future<Database> get database async {
        if (_database != null) {
            return _database;
        }

        _database = await initDB();
        return _database;
    }

    initDB() async {
        Directory documentsDir = await getApplicationDocumentsDirectory();
        String path = join(documentsDir.path, 'my_app.db');

        return await openDatabase(path, version: 1, onOpen: (db) {
        }, onCreate: (Database db, int version) async {
            await db.execute('''
                CREATE TABLE user(
                    id INTEGER PRIMARY KEY,
                    name TEXT NOT NULL
                )
            ''');
        });
    }
}
With that small amount of code, you’re up and running with an SQLite database and a table. From here, we can create a model for each object that we can then use to query the database. In the case of the example above, we need a model for the user. Here’s a magnificent tool that makes converting JSON to a model a breeze: https://app.quicktype.io/#l=dart. For the user, the model would look like this:
user_model.dart
import 'dart:convert';

User userFromJson(String str) {
    final jsonData = json.decode(str);
    return User.fromJson(jsonData);
}

String userToJson(User data) {
    final dyn = data.toJson();
    return json.encode(dyn);
}

class User {
    int id;
    String name;

    User({
        this.id,
        this.name,
    });

    factory User.fromJson(Map<String, dynamic> json) => new User(
        id: json["id"],
        name: json["name"],
    );

    Map<String, dynamic> toJson() => {
        "id": id,
        "name": name,
    };
}
With this, we can now convert back and forth between a JSON string and a User object. Creating a user and getting a user from the database can now be done like so:
queries.dart
newUser(User user) async {
    final db = await database;
    var res = await db.insert('user', user.toJson());

    return res;
}

getUser(int id) async {
    final db = await database;
    var res = await db.query('user', where: 'id = ?', whereArgs: [id]);

    return res.isNotEmpty ? User.fromJson(res.first) : Null;
}
With that, we can set up a form that creates a new user, as well as displays that user’s information somewhere else in the app. This is a very simple example of what can be done, but I hope this shows how effortless it is to set up a backend for your app and display that data to your user.
Complaints
At the time of writing, I have one complaint about Flutter. DropdownButtonFormField widgets, for me, were a nightmare to work with. Despite what I’ve said about Flutter giving you a lot of control, DropdownButtonFormFields are not easy to work with and seem to be lacking some control.
For my rework, I planned on using a dropdown field in order to allow a user to select an icon for their account. The functionality worked fine, but the design didn’t. The dropdown dialog took up the entire height of the screen with no way of reducing it. As well as that, trying to center the selected item just did not work, despite trying everything I could think of. Centering items worked fine with the DropdownButton widget, but not the DropdownButtonFormField widget. I very well could have missed something that made all of this easier.
Despite that, me not having any luck with the DropdownButtonFormField led me to a much better way of handling the icon selection. You always have other options when working with Flutter.
Final Thoughts
I absolutely love working with Flutter and I see myself continuing to use it for a long time. If you’re on edge about it, give it a shot, I think you’ll be happy with it. UI development is exceptionally easy and feature-rich, and backend development is powerful and simple to use. Best of all, you write the code once and it works on iOS and Android, natively. There are a few issues, but Flutter is still a fairly new project, so I have no doubt these issues will be ironed out eventually. With all of this in consideration, I do believe Flutter to be the future of mobile development. If it isn’t, it’s at the very least a step in the right direction.